Is it Safe for There to be Snow on Your Chimney?
Winter brings a picturesque landscape with glistening snow-covered rooftops, but as homeowners, we need to be vigilant about the safety of our homes. One area of concern that often arises is the presence of snow on and around chimneys. In this blog, we will explore common worries, the impact of snow on chimney structure, potential dangers, and most importantly, how to ensure your chimney remains safe during the winter months.

Common Concerns About Snow On Chimneys and Heating Structures
It’s not uncommon for homeowners to wonder about the safety of having snow up against their chimneys. Questions like, “Will it damage my chimney?” or “Could it have long term effects?” often come to mind. Let’s address these concerns and separate fact from fiction.
Impact of Snow on Your Chimney’s Structure
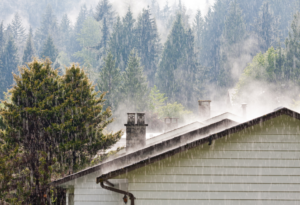
The accumulation of snow on and around a chimney can pose structural risks over time. The weight of the snow, particularly if it turns into ice, can compromise the chimney’s integrity. This raises concerns about stability and the potential for costly repairs. The thawing and freezing cycle of the water can cause serious water damage to the masonry. Specifically, mold, mildew, and efflorescence can occur. These issues can lead to the need for masonry services for repair. You can learn more about common winter chimney problems in our blog post.
Does Snow Build-Up Cause Fire Hazards?
A major worry of any chimney and fireplace user is fire hazards and the possibility of blockages. Luckily, snow does not pose much of a concern as a fire hazard because it will not block the chimney flue. This is because snow on the chimney will melt when it hits the hot flue gasses or warmer chimney structures.
Dangers of Snow with Alternate Heating Methods
Once we are warm in our homes, we tend not to think that there’s a chance that the heat’s output could pose danger. While snow may melt off your chimney flue, it will not naturally melt around a high-efficiency vent duct. These vents are generally located on the rear or side of the house and “goose-necked” at the top. It is important to clear the snow around these vents to allow for proper output and ensure the gasses do not get stuck within the system, as that can pose serious hazards.

Winter Maintenance Tips for Chimneys
Regular chimney inspections and maintenance are essential, especially during the winter. We’ll discuss practical tips for homeowners to keep their chimneys in top condition throughout the colder months.
Have Your Chimney Inspected
When was your last chimney inspection? Your chimney should be inspected every year to make sure there is no fire risk or carbon monoxide poisoning danger to your household. Additionally, chimney inspections can ensure that your fireplace is operating well and isn’t a source of energy loss in your house.
Similarly, you should schedule a chimney inspection once a year and sweep as needed to eliminate creosote and soot buildup, which becomes dangerous if left unattended. To ensure your specialist is qualified for the work and has had sufficient training, we advise selecting a CSIA certified chimney sweep like Best Chimney Services.
Ensure Your Chimney is Clean
Over time, chimneys can accumulate creosote build-up, which can be a fire hazard and pose other dangers, including health effects. Getting a professional chimney cleaning will remove the build-up, and the team will ensure the flue is also clear of any debris to allow for proper ventilation. Learn more about why you need a professional chimney cleaning in our blog post.

Install a Chimney Liner
A chimney liner helps protect the chimney walls from the corrosive byproducts of combustion. It also improves the efficiency of your heating appliance.
Install a Chimney Cap
Chimney caps are not only useful in preventing animals and debris from entering; they also help keep snow and ice out. Install or inspect your chimney cap before winter sets in.
Contact Best Chimney Services for Your Winter Chimney Needs
We understand your concern about snow on your chimney during the winter months! As long as you know of the possible structural concerns, you can do your best to prevent them with chimney inspections, chimney sweeping, installing a chimney liner, or more with our experienced chimney professionals at Best Chimney Services. Click here or call (781) 893-6611 to schedule an appointment with us! You can read more about how to prepare your chimney for winter in our blog to ensure your chimney gets the service it needs heading into the snowy months.
The post Is it Safe for There to be Snow on Your Chimney? appeared first on Boston's Best Chimney.


 What Causes Chimney and Fireplace Odor
 Waterproof Your Chimney
 What Causes Fireplace Odors?
 The Origin of Fireplaces
 Today
Today Be aware of the dangers involved in fireplace use. It is important to know the causes of chimney fires and how to protect yourself and your family from them. More than 25,000 chimney fires are incurring with over $125 million in property damage each year.
 Heatproof Glass Doors
 What is Creosote?
 Another way you can reduce creosote buildup is to burn hardwood like oak, birch, and hard maple. These types of wood produce more heat and produce less creosote. They may cost a little more, but you can’t put a price on your family’s safety.